首先给出demo地址,有问题也可以直接看代码。https://github.com/licheng-xd/dubbo-sleuth
准备
sleuth是springcloud对zipkin接入的封装,从2.0开始直接采用了brave提供的zipkin接入实现。
由于sleuth对dubbo的支持是从2.0开始的,所以一咬牙直接把整个项目升级成了springboot2.0,springboot2.0和springboot1.x有很多不兼容的地方,这里就不一一细说了,同时springboot升级到2.0以后,dubbo也必须要从0.1.0升级到0.2.0(Apache旗下的dubbo版本),整个过踩坑踩了一个星期。
因为springcloud的微服务框架是基于http构建的,所以sleuth默认是只支持http。在2.0版本中提供了对dubbo的支持,其实看一下源码就知道,就只是一个DubboFilter。后面实现自己的rpc接入sleuth就是参考了它的实现。zipkin本身支持多种collector和storage,默认采用异步http的collector,存储默认在内存中。考虑到对应用本身的性能影响,我们采用kafka来做collector,最大程度的解耦以及减少性能影响。存储选用es,用mysql的话当数据量较大时会影响zipkin-server的查询速度。
本地测试环境部署:
本地采用vagrant管理开发环境,在debian的虚拟机中装好,zookeeper,kafka,es,其中es建议用docker镜像直接运行,不需要修改很多系统参数。
启动zipkinserver,采用kafka-collector和es-storage。
我本地的vagrant虚拟机ip是192.168.100.101,首先下载zipkin-server,启动命令:
1
| KAFKA_BOOTSTRAP_SERVERS=192.168.100.101:9092 STORAGE_TYPE=elasticsearch ES_HOSTS=http://192.168.100.101:9200 java -jar zipkin-server-2.9.4-exec.jar
|
项目添加sleuth依赖
由于采用kafka作为collector所以需要原来spring-kafka,同时添加了brave-dubbo的依赖。
1
2
3
4
5
6
7
8
9
10
|
compile "org.springframework.kafka:spring-kafka:2.1.7.RELEASE"
compile "org.springframework.cloud:spring-cloud-starter-sleuth:${SleuthVersion}"
compile "org.springframework.cloud:spring-cloud-starter-zipkin:${SleuthVersion}"
compile "org.springframework.cloud:spring-cloud-sleuth-core:${SleuthVersion}"
compile "org.springframework.cloud:spring-cloud-sleuth-zipkin:${SleuthVersion}"
compile "org.springframework.cloud:spring-cloud-sleuth-dependencies:${SleuthVersion}"
compile ("io.zipkin.brave:brave-instrumentation-dubbo-rpc:5.1.0") {
exclude(group: 'com.alibaba', module: 'dubbo')
}
|
配置
1
2
3
4
5
6
7
8
9
10
11
12
13
| spring:
application:
name: nim-bima-service-user
zipkin:
sender:
type: kafka
sleuth:
enabled: true
traceId128: true
sampler:
probability: 1.0
kafka:
bootstrap-servers: xxx.xxx.xxx.xxx:9092,xxx.xxx.xxx.xxx:9092
|
dubbo服务和消费端都需要加上对应的tracing filter
1
2
3
4
5
| dubbo:
provider:
filter: 'tracing'
consumer:
filter: 'tracing'
|
扩展
自研RPC通过filter接入sleuth追踪。filter逻辑的核心在于filterchain的实现,而filterchain的核心逻辑其实就是一个链式的递归调用:
1
2
3
4
5
6
7
8
| if (this.currentPosition == this.realFilters.size()) {
invocation.invoke();
}
else {
this.currentPosition++;
NrpcFilter nextFilter = this.realFilters.get(this.currentPosition - 1);
nextFilter.doFilter(invocation, this);
}
|
然后通过实现filter来加入追踪功能
1
2
3
4
5
6
7
8
9
10
11
12
13
14
15
16
17
18
19
20
21
22
23
24
25
26
27
28
29
30
31
32
33
34
35
36
37
38
39
40
41
42
43
44
45
46
47
48
49
50
51
52
53
54
55
56
57
58
59
60
61
62
63
64
65
66
67
68
69
| @FilterActivate
public class TracingNrpcFilter implements NrpcFilter {
private static final Logger logger = LoggerFactory.getLogger(TracingNrpcFilter.class);
private Tracer tracer;
private TraceContext.Injector<Map<String, String>> injector;
@Autowired
public void setTracing(Tracing tracing) {
tracer = tracing.tracer();
injector = tracing.propagation().injector(SETTER);
}
@Override
public void doFilter(TaskInvocation invocation, NrpcFilterChain filterChain) throws Exception {
if (tracer == null) {
filterChain.doFilter(invocation, filterChain);
return;
}
logger.debug("NrpcTracingFilter hit ...");
String className = invocation.getTask().getMethod().getDeclaringClass().getSimpleName();
String methodName = invocation.getTask().getMethod().getName();
final Span span = tracer.nextSpan();
injector.inject(span.context(), invocation.getAttachments());
if (!span.isNoop()) {
span.kind(Span.Kind.SERVER).start();
span.name(className + "/" + methodName);
InetSocketAddress remoteAddress = invocation.getRemoteAddress();
Endpoint.Builder remoteEndpoint = Endpoint.newBuilder().port(remoteAddress.getPort());
if (!remoteEndpoint.parseIp(remoteAddress.getAddress())) {
remoteEndpoint.parseIp(remoteAddress.getHostName());
}
span.remoteEndpoint(remoteEndpoint.build());
}
String traceid = span.context().traceIdString();
DubboTraceFilter.initTraceid(traceid);
invocation.getTask().setTraceid(traceid);
try (Tracer.SpanInScope scope = tracer.withSpanInScope(span)) {
filterChain.doFilter(invocation, filterChain);
} catch (Error | RuntimeException e) {
onError(e, span);
throw e;
} finally {
span.finish();
}
}
static void onError(Throwable error, Span span) {
span.error(error);
if (error instanceof RpcException) {
span.tag("nrpc.error_code", Integer.toString(((RpcException) error).getCode()));
}
}
static final Propagation.Setter<Map<String, String>, String> SETTER =
new Propagation.Setter<Map<String, String>, String>() {
@Override
public void put(Map<String, String> carrier, String key, String value) {
carrier.put(key, value);
}
@Override
public String toString() {
return "Map::set";
}
};
}
|
小技巧:通过tracer.currentSpan().context().traceIdString();把tracing中的traceid拿出来放到业务日志中,结合elk日志收集可以非常容易定位问题。
结果
可以从zipkin的数据分析中清楚的看出来整个请求中的rpc调用链,以及每次rpc消耗的时间。

依赖分析
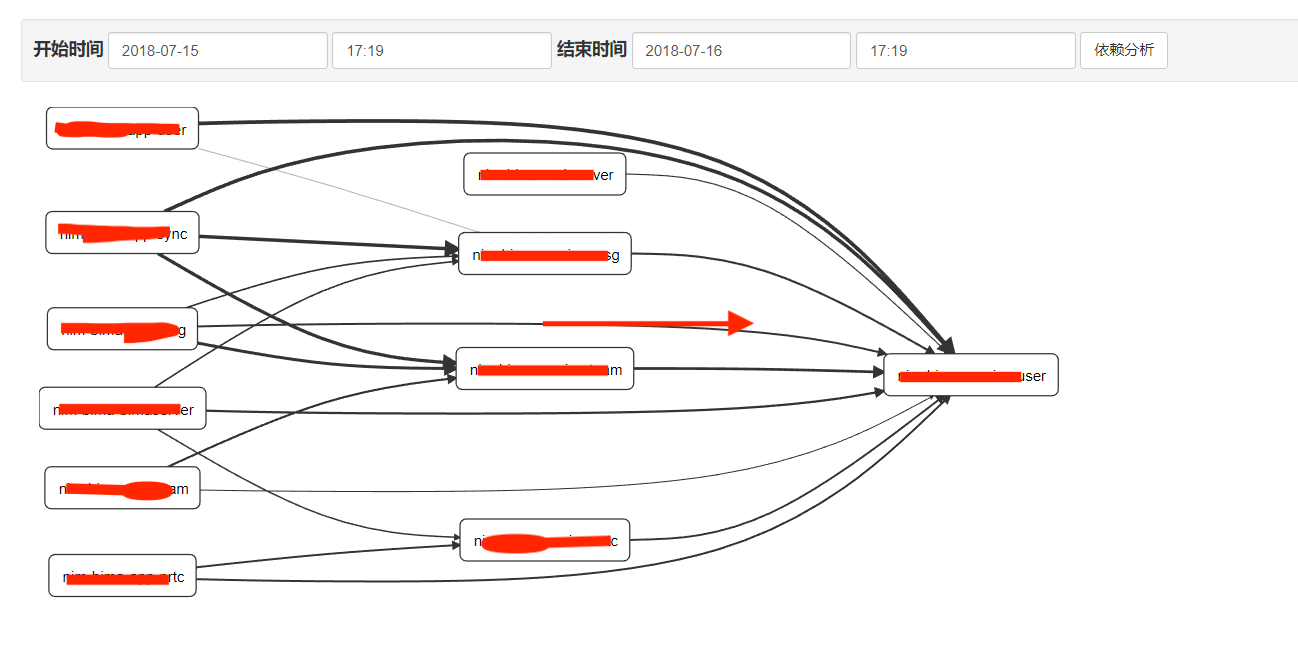
你会发现依赖分析页面没有数据。对了,只有当数据在内存中存储的时候,zipkin-server才能直接分析出调用依赖关系。当采用外部存储的时候,就需要单独的依赖分析来实现了。下载zipkin-dependencies.jar并在crontab中创建定时任务,定时对存储数据进行分析,这样就可以看到依赖关系了。

奇怪的小问题
由于引入了springcloud-sleuth,而springcloud会在进程启动时启动一个自己的bootstrap context,作为当前应用ApplicationContext的父ApplicationContext,由于每初始化一个ApplicationContext就会加载一遍spring.factories配置文件中的ApplicationListener,所以配置在spring.factories中的listener都会被执行两次。因此dubbo的WelcomeLogoListener会被执行两次。
使用feign作为http客户端时,build传入的client必须是spring的bean,否则sleuth无法做拦截。

